10 Gmail Hacks to Optimize Your Email Inbox

This post is part of the Monday series on simplifying that inspired my book, Your Simple Home Handbook. The series began with 10 Reasons to Start Simplifying Now.
Sometimes we don’t realise that virtual clutter can be just as big a problem as physical clutter is. If you want a simpler life, purge and organise your virtual space, too–the computer desktop, your social media, digital photos, etc.
Earlier I shared some strategies that have helped me to simplify my email inbox. I love that having a simple inbox system helps me to keep track of tasks, communications and appointments better.
Gmail has a lot of built-in bells and whistles that if you know how to use, are actually quite handy for keeping things organised and customized.
Here are just a few of the things you can do:
1. Configure inbox
See those tabs for “Social” and “Promotions” at the top of the inbox? Gmail may sort some of your incoming messages into those areas. To me, that’s unhelpful because it’s as if you have three inboxes to check instead of just one. And one is hard enough to keep up with. Ditch the tabs by going to the gear icon in the upper right quadrant of your inbox. Select “Configure Inbox” from the dropdown. In the new window that pops up, uncheck all the boxes except “Primary.” Hit “Save.”

2. Display density
Under the gear tab you’ll see three “Display density” options: Comfortable, Cozy, and Compact. Try out each option. “Compact” mode fits more onto your screen, which you might find efficient. I prefer “Comfortable,” though, for the breathing room.
3. Messages per page
How many messages do you want to display per page? Go to the gear tab, then Settings–> General–> Maximum page size. The amount you choose to display will depend on the email policy you’ve decided on. Is it your goal to have no more than 50 emails sitting in your inbox at a time? No more than 25? Choose accordingly. When your inbox fills to multiple pages of messages, you know it’s time to whittle it back down to just one page.
4. Search feature
Use the search bar at the top of your inbox for digging up old messages. Search by keywords that you remember from the message, or by people’s names or email addresses. Here are a ton of other ways to customize your search options in Gmail.
5. Canned responses
Canned responses are templates that you can insert into the message body when composing an email. They’re useful if you have to send out very similar messages to multiple people.
To enable canned responses, go to the gear–> Settings–>Labs. Enable “Canned responses” and click “Save Changes.”
To create a new canned response, click “Compose” to open a new message. Write out your canned response, then click the arrow next to the trashcan icon on the bottom right of the compose box. Click “Canned responses,” then “New canned response.” Name the response.
To insert a canned response, click “Compose” to open a new message. Click the arrow at the bottom of the compose box and click “Canned responses.” Under “Insert,” select the canned response you want to insert.
6. Mark messages
Marking your messages is handy for assessing at a glance how emails need to be addressed. For example, if I’m doing a quick sweep of my email inbox I mark each message with a different colored star, depending on which project or client it relates to. Later, I can go back through and answer all the red-starred messages, all the yellow-starred, etc.
Or, I may dump all the incoming messages for a particular project into one folder. Later I go into the folder and address the messages one by one. As I finish, I mark each message with a green star so I know it’s done.
To enable more star options, go to the gear–> Settings–> General. Scroll down to Stars. Drag the icons you want from the “Not in use” area to the “In use” area. To mark a message, click the star outline next to the message. Continue clicking until you reach the icon you want for that message.
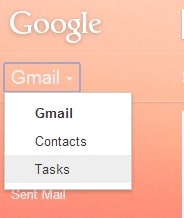
7. Tasks
Use Tasks to create to-do lists for yourself and set reminders. Right above the “Compose” button, click the down arrow next to “Gmail” and select “Tasks.” A new window will pop up at the bottom of your screen. Click the + to add a new task. Click “Actions” for more options.
8. Signature
Want to automatically add a signature at the bottom of all outgoing messages? Go to the gear–> Settings–> General. Scroll down to “Signature” to enable and customize your message. Some people include a quote after their name, or you may want a link back to your website. Don’t forget to click “Save Changes” at the bottom when you’re done.
9. Vacation Responder
Send an automatic reply to all incoming messages for a specified period of time. Go to the gear–> Settings–> General. Scroll down to “Vacation responder” to enable and customize your message. Don’t forget to click “Save Changes” at the bottom when you’re done.
10. Themes
Personalize your look! Just for fun, go to the gear icon and click “Themes.” Pick a backdrop for your email inbox to suit you mood. Check out the Custom Themes, too (there are dozens to choose from), or upload one of your own photos.
There are many, many more things you can do to optimize your Gmail inbox, but my writing time is up for the morning! Feel free to share your favourite Gmail hacks in the comments below. And if you have a Gmail account, connect with me on Google Plus!

Do you want lots more simple living ideas? Check out my brand new book! Your Simple Home Handbook is a 100+ page guide to decluttering your home and simplifying your stuff. Work through 30 different areas of your home–at your own pace–and enjoy the benefits of a space that breathes! Click here to learn about my book!
SO many good ideas. I still need to go through and organize/delete old emails. I seriously have over 1000 in there! NOT good! You are an inspiration 🙂
Some Good Tips but i already know 7 tips that listed here
Great tips! I just discovered your blog and am enjoying clicking through and following the related embedded links for more good advice. Thank you!
FYI, I noticed in the post above that the Signature and Vacation Responder have the instructions swapped 🙂
Welcome, Jessica! So glad to have you here! And thanks for catching that…I’ll go fix it straight away!